Git Bisect Tutorial
Git bisect is a very convenient way to efficiently find the commit that introduced a bug. In this short tutorial I will show you how to use this feature. In the end, you can experiment with git bisect on your own. If you want to directly experiment with the code, you can directly jump to the code challenge.
There are two ways of how to use git bisect. The manual and the automatic one. We will discuss both in the following.
Manually using git bisect
Git bisect is a command that helps you to efficiently find a commit that introduced a bug. The only information it needs is a start and end revision, which specifies the range in which git bisect should search. The algorithm uses a binary search, which runs in O(log(n)), where n is the number of commits between start and end.
You need to go to the root of the repository you want to use and type “git bisect start” to state that you want to start. Now, you need to specify the range in which you want to search. This is between the revision you know that the behaviour was correct and the current revision where something is incorrect.
You need to specify this information by typing “git bisect bad < commit_id > and “git bisect good < commit_id >.
This is all the information git bisect needs and it directly starts after you provide this information.
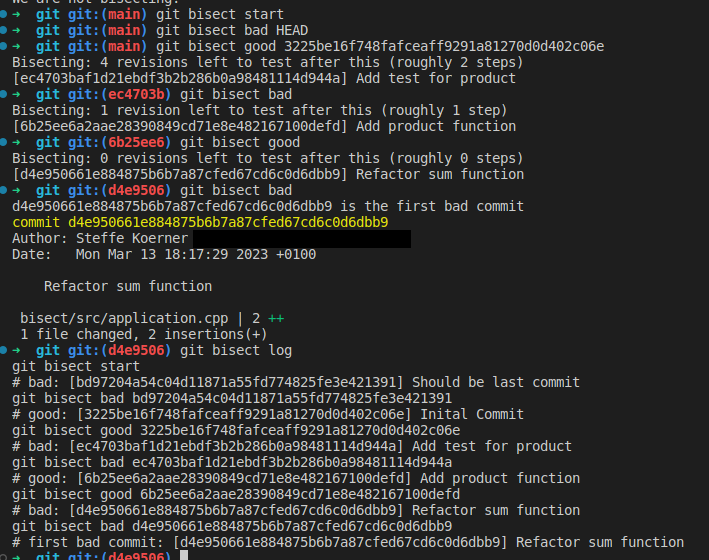
It now finds the commit in the middle of the range and checks it out. It also estimates how many more steps are needed to find the buggy commit. This can be seen in the image below.

It’s now up to you to check if this revision is good or bad. This means you need to check if this revision is correct or there is still some incorrect behaviour. You need to provide this information to bisect.
This is done by entering either “git bisect good” or “git bisect bad”. After you type this information, git bisect shows you the next revision to check. You need to evaluate it again and provide the feedback. This proceeds until git bisect tells you the first buggy commit as can be seen in the image.

Nice job, you found the commit that introduced the bug.
Aborting git bisect
If you did something wrong, like for example typing git bisect bad instead of good, you can stop bisecting by typing “git bisect reset”.
History of git bisect
If you want to see which revisions git bisect tested, you can check the log. Just type “git bisect log”. This will show you the complete history.
The process was very easy, but still very tedious. There have been a lot of manual steps. You needed to manually check each revision and provide feedback. The big question is if we can automate this process. And the lucky answer is that we often can do it. We will have a look how to do it in the next section.
Automatically using git bisect
In the last section, we investigated on how to manually find the first commit that introduced a bug. Now we want to automate this process.
The first step is to think about how we manually would check if the current version is good or bad. Then specify this behaviour in a shell script. This can often be done by writing a unit test. This test is then called from the shell script. If the revision is good, the script should return 0 and between 1 and 127 (inclusive), except 125, if the current revision is bad.
More details can be found by typing “git bisect –help”.
We now have a criterion that automatically can evaluate if a revision is good or bad and call it by our shell script. The last open question is how to call this shell script. Luckily, there is a very easy way. We just run
- git bisect start
- git bisect bad < commit_id >
- git bisect good < commit_id >
- git bisect run < script.sh >
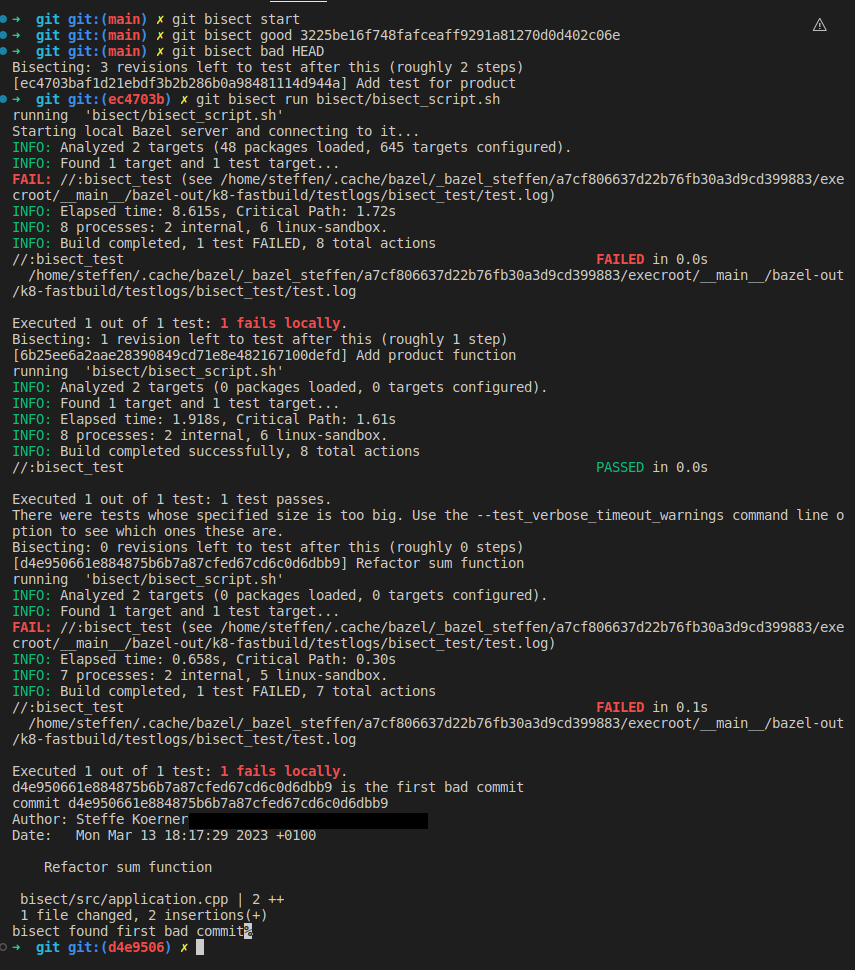
The first 3 steps are the same as with the manual approach. But instead of manual reviewing the provided revision, we till git to use the provided script. Now git executes our script on each revision and tells us the buggy commit without any extra step as can be seen in the image below.
In this example, I used a unit test that I executed with bazel, which I call from the bisect/bisect_script.sh. You can see that the test was first executed for revision ec4703baf1d21ebdf3b2b286b0a98481114d944a where it failed. In the next revision it passes and in the last one it fails again. Then git bisect returns the buggy commit. That’s awesome.
The devil is in the details
This sounds very straightforward. Unfortunately, there are some details that often make it more complex. You can’t just add a unit test to your existing test file. That’s because git bisect will checkout the next revision that needs to be reviewed. But this one doesn’t have your test anymore.
Thus, you need to think about how you enable the execution of your new test in old revision. This highly depends on your test setup.
I normally just create a new test file that contains my test. Then I call this one in every step. That’s what you can see in the image above. But this only works, as my test target automatically includes all files inside the test folder.
If you don’t have such a test target, but I strongly recommend it, you still have the option to create the test in one of your tests files. You then git stash push
Of course, you can put the steps again into a script, but you need to run it manually on each step as you can have merge conflicts. Of course, you first try to run it completely automatically.
It’s your turn
I created a small C++ project with bazel that you can use to experiment with git bisect on your own. Try to find the buggy commit. The code can be found in this repository. Just follow the README. Good luck my friend.